Last week, I was lucky enough to participate in a technology sprint and demonstration day over at the Rowes Bay Sustainability Education Centre along with participants from ScienceMob, James Cook University eResearch Centre and the Townsville City Council. Our goal was to demonstrate a low cost platform for high quality sensing applications by putting together a complete experiment that measured temperature, humidity and light levels of a series of test chambers with different roofing colours and levels of insulation and then to publish that data up to the internet so that it could be queried and visualised via a webservices interface. Well, to cut to the chase, the event was a success and by the end of it we had managed to show that with a few bucks, a lot of technical know-how and a bunch of people who had never met each other before it was possible to use opensource software and hardware to create a highly accurate wireless web-enabled sensor network and visualisation. Here’s the video that Scott Mills of ScienceMob put together describing the process:
Those with a desire for more technical details, read on!
The system
Below is a diagram of the systems architecture that we eventually settled on for the experiment (click to embiggen).
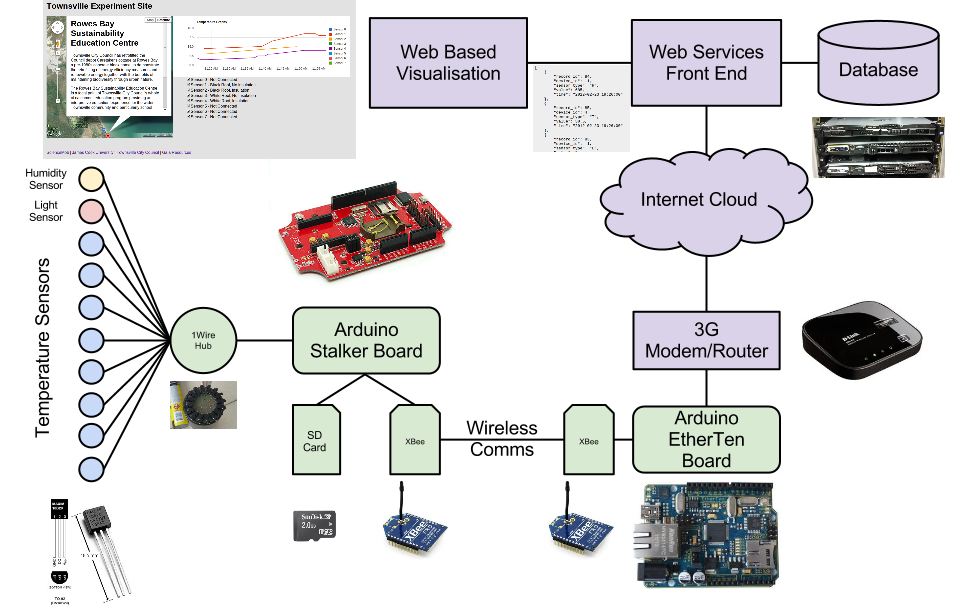
As you can see, quite a complex systems architecture, but by no means unachievable particularly given that the majority of components were simply off the shelf. One of the beauties of using the Arduino platform is that it is well documented, well supported and there are quite a range of shields and compatible sensors around, so interfacing them requires only a basic electronics knowledge and often little to no soldering. So, starting at the left, I’ll walk through each of the major components of the experiment.
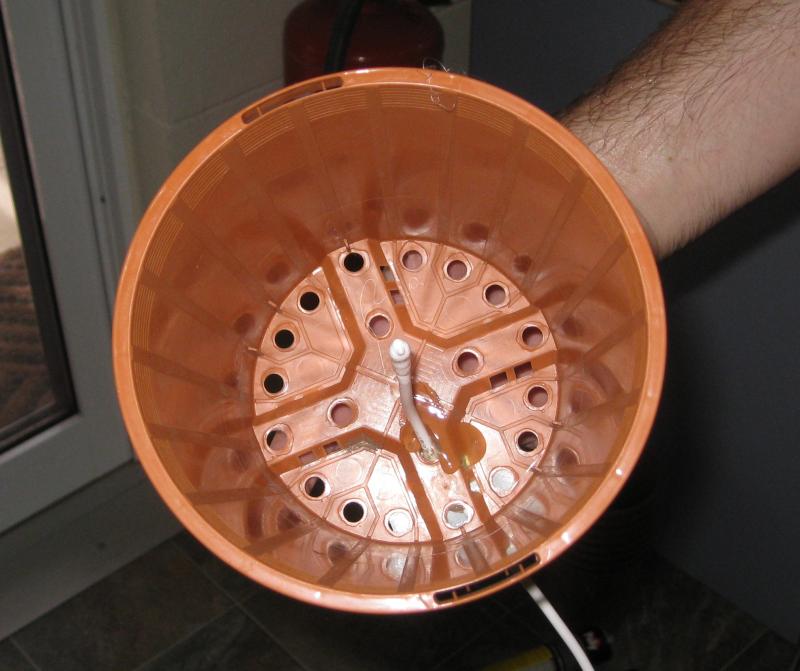
Firstly, the temperature sensors were to be mounted into test vessels furnished with either black or white tin roofs and varying thicknesses of reflective clad insulative rubber. The picture below shows the construction of the test roofing materials:

The sensors themselves are a relatively cheap off the shelf product that ScienceMob and JCU have developed a calibration technique for, which gives them a 0.1 degree C accuracy. This is a great example of being smart about technology which results in very high quality data capture at a cost-efficient price. The sensors were simply mounted into a flower pot on which the roofs were to be mounted. You can find more information on the temperature sensors we were using here.
These pots were then buried out in the yard of the Sustainability Centre in the sun to see how they would react to the sun’s warmth. The temperature sensors are a Dallas 1-Wire device which means that you can connect multiple sensors up to a single input on the Arduino. To do this, however, you either need to connect multiple devices up, to a single wire, and the way that we did this was via a custom board that Scott put together to act as a 1-Wire hub:

We did find that there are many limitations with the use of 3.5mm audio jacks, however, and in the future we’ll be using something a little more robust and weather resistant.
Incidentally, by the time we’d gotten to this part of the build, the room we were using as a workshop looked something like this:

From here, the next pieces of magic are mostly in code. The Arduino microcontrollers are programmed in a C like language into programs called sketches. On the sensor Arduino (the Stalker) Jerry from JCU wrote a sketch that woke up the board periodically based upon an interrupt from the Real Time Clock on the board. This meant that the power consumption of the board could be kept to an absolute minimum, which was requirement considering we were powering the unit from a solar panel and a small lithium rechargeable battery. Once woken, the board would then poll the temperature, humidity and light readings from each of the sensors, run this through the calibration algorithms for each sensor to correct the quality of the reading, and then write this out the XBee Wireless module.
The other Arduino in the setup was a Freetronics EtherTen. This board was configured also with a Xbee module and sat there listening for sensor updates from the Stalker. When updates were received, the EtherTen was programmed to convert the sensor readings into an HTTP request that was sent via ethernet to the 3G modem and over to a Gaia Resources server in our datacenter in Perth. The server was setup with some simple PHP scripts to write the sensor readings into a PostgreSQL database for later analysis and visualisation. We also put together some simple webservices to provide querying into this dataset and pulling the data out in JSON format.
Finally, we knocked together a simple HTML page that used the webservices that we wrote earlier, the Google Maps API and the Google JSAPI to show some near real time graphs of the data feed (click for feed):

All up, not a bad effort for a day’s work.
So what did we learn?
Tech Sprints are an excellent way to rapidly prototype a solution for a problem. The best thing about these kinds of events, however, is not that you get the job done, it’s that you get a really good understanding of the problem – the gotchas – that enables you to put together a really robust and tuned solution in a more realistic timeframe. Some of the gotchas we encountered were:
- Weatherproofing – This kind of experiment if very subject to weather conditions and the elements. This became very evident the morning after the sprint when we discovered that the massive downpour that had occurred overnight had swamped the 1-Wire hub with water. Always ensure you have enough weatherproofing for the environment in which you’re deploying into.
- Fabrication takes time – Especially when we’re mostly electronics and computer geeks. Regardless, I think we did fairly well in this regard and were able to get a good test bed up and running in the allocated time.
- Teamwork and Leadership – I think we did this quite well. Scotty had a great understanding of the system as a whole, and ensured that we had expertise in all areas of the system present so that when the time came to integrate various parts of the system, we always had someone on hand who knew how to do it. The willingness of everyone present to simply jump in and do what was required is what made this Tech Sprint work.
- Define your interfaces between components and build test data to support development of them – We did this both well and poorly depending on the part of the system. Many of our interfaces were standards based. The temperature sensors utilised the 1-wire standard, so Scott could go off and build the sensors whilst Jerry programmed the Arduino to talk to them. The flower pots were all a standard size so Ian could go off and dig standard size holes… What we didn’t get so right was the test data. We did find on a couple of occasions that we were waiting on one part of the system to be complete before we could finish testing and developing other parts – for example, waiting for temperature data to be published to Xbee so that we could feed it up to the Web Services.
- Always bring spare parts – For when there’s a downpour and your equipment gets drenched. It would also have been handy if we had another Xbee module so we could snoop on the over the air data without having to pull apart our experiment rig.
- Be flexible – We were really good at this. When something isn’t going to work, move on and try something else. This occurred several times throughout the day and without this flexibility, I don’t think we would have a working system now.
The future…
The future of this experiment hasn’t been written yet, but I’m sure most of you reading this can see a bunch of ways this technology could be used. Although temperature sensing is interesting and useful, it’s really just the tip of the iceberg as to how this could be applied. We spent some time workshopping sensors, platforms and applications for this system and the results were wide and varied. Some examples are:
- Acoustic sensing & automatic categorisation of birds, bats, frogs
- Moisture, flow rate, humidity sensing in various levels of rainforest strata
- Ocean current and water chemistry sensing
- Motion activated camera traps with correlated environmental data
- Cloud cover and cloud height
- Video and photo monitoring
- In vehicle/aircraft monitoring (think black box recorder)
All of which could be remote, self powered and low maintenance and feeding back in real time, or it could be off the grid and recording to local storage.
The aim of this experiment was to prove that this was all doable, and I think we’ve got a compelling enough evidence at this point to prove that it is!
Comments are closed.